Troubleshooting and Configuring the Windows NT/95 Registry
-34-
Creating Custom Policies
One of the best things about System Policy Editor is its capability to add policies and Registry changes to the ones already present. The current template files include many options and restrictions, but much more is possible. Many of the Registry changes discussed in Chapters 13 through 25 are perfect for implementation as custom policies because of their universal application to all users on the network.
Any Registry change can be implemented across the network, given to computers, individuals, or groups. There is actually no faster way to manage and update Registries than this.
This chapter explains the file structure, what items affect which parts of the policy file, and walks through some examples. The most important part of this chapter is how to create a usable .ADM template file. Because the template file structure is the same for both Windows 95 and Windows NT, as long as the Registry change will work, the template will work for both.
TIP: Test your Registry change as a manual change before creating a policy for it. If it doesn't work as a manual change, it won't work as a policy.
.ADM File Structure
Knowing the required syntax for a template file is critical for understanding
current files and for creating new files. Any mistakes in the template file result
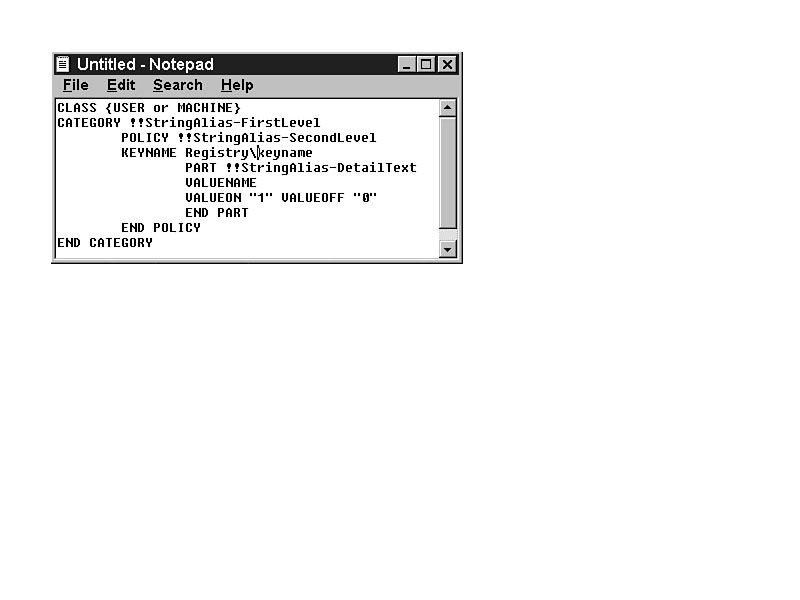
in errors and require changes before the file can be loaded as a template. Figure
34.1 illustrates the structure of a simple policy file.
Figure
34.1. Policy
file structure.
CLASS
Because you are only going to be changing HKEY_LOCAL_MACHINE or HKEY_CURRENT_USER, your only options for the CLASS setting are
- CLASS MACHINE
- CLASS USE
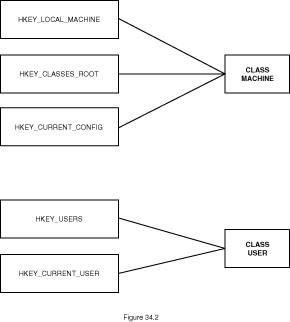
The CLASS entry determines whether the entry will affect the computer
or the user functions. It is possible to have CLASS entries for both user
and computer in the same template file. Group all policies under these headings according
to type of change, as shown in Figure 34.2.
Figure
34.2. Registry handle
key determines class.
CATEGORY
The CATEGORY setting sets the text for initial headings. It also groups multiple policies for ease of use and editing. You can have as many categories under a heading as you want. You can also put additional subcategories under a category to create a more detailed hierarchical structure.
Close the CATEGORY section with an END CATEGORY command.
POLICY
The POLICY section is where you actually make the choice to implement the change. It puts a check box before the text, allowing you to set it for Ignore, Activate, or Deactivate.
Close the POLICY section with an END POLICY command.
KEYNAME
For each policy, there must be a KEYNAME and at least one value. The KEYNAME entry must start at the level below the handle key.
TIP: Do not start the KEYNAME with a backslash (\). Start with the key below the handle key. If you start with a backslash, the file will be imported without error, but the setting will not work.
VALUENAME
The VALUENAME is the same as in the Registry. Ensure that there are no spaces in the value name in the policy file if there are none in the Registry change.
PART
The data for the values and the type of System Policy Editor entry desired are listed in PART.
Close the PART section with an END PART command.
Strings
Strings are shown in the .ADM file starting with a double exclamation
(!!). The text following the double exclamation cannot include a space.
The text listed in the [Strings] section replaces the STRING entry
in System Policy Editor. An alternative is to simply put the text in quotation marks
(as shown in Figure 34.3).
¬ Text in the [Strings]
section.
Each of the corresponding parts of the System Policy Editor screen is generated
by the .ADM file. An example from the WINNT.ADM file is shown in
Figure 34.4.
Figure
34.4. Each section
of the .ADM file affects the System Policy Editor screen.
TIP: One of the most common mistakes by creators of template files is the omission of the closing entry. For every CATEGORY, there must be an END CATEGORY. For every POLICY, there must be an END POLICY. For every PART, there must be an END PART.
Creating a Custom Policy: MenuShowDelay
MenuShowDelay is a Registry change that makes the system feel faster because the menus respond to mouse movement more quickly. It uses the Control Panel\Desktop key. Because it affects the user, make it a CLASS USER entry. Use Notepad, WordPad, or any text editor or word processor to create the file. When you finish, save it as a text-only file with an .ADM extension.
NOTE: For more details on the MenuShowDelay Registry change, see the section titled "Boost the Speed of Your Menus" in Chapter 23, "Windows NT 4 Users and the Registry," and Chapter 25, "Windows 95 Users and the Registry."
TIP: The text for CATEGORY and POLICY can be any text. You can use the actual text in brackets or use the text-string options (!!) for a reusable string.
Listing 34.1 contains the text for this .ADM file that will provide the MenuShowDelay option in System Policy Editor.
Listing 34.1. MenuShowDelay template file.
CLASS USER
    CATEGORY !!SPEED
        POLICY "Boost Menu Speed"
        KEYNAME "Control Panel\Desktop"
            PART "Enter menu speed (1-10000, lower is faster)" EDITTEXT
            VALUENAME MenuShowDelay
            END PART
        END POLICY
    END CATEGORY
[STRINGS]
SPEED="Enhance Interface Performance"
NOTE: The entries in an .ADM file are not case-sensitive. They are shown here and in the standard template files with upper- and lowercase to make them easier to read. The tabs are also not required, but are used to make the file more readable. Each entry must be separated by one of three characters: a hard return, a tab, or a space. If there is a space in text between two words that are supposed to stay together, use quotes around them to indicate the text as one entry.
NOTE: administrator to type in a value. For more details on the type of parts available, see Appendix I, "System Policy Editor Keyword Reference."
Save the file as a text file with an .ADM extension. It does not have to be in \WINNT\INF with the rest of the template files, but it makes it easier to find.
TIP: Initially, save all your Windows 95 templates separately from your ADMIN.ADM file. Import the file into System Policy Editor, test it, and then append it on the end of your ADMIN.ADM file.
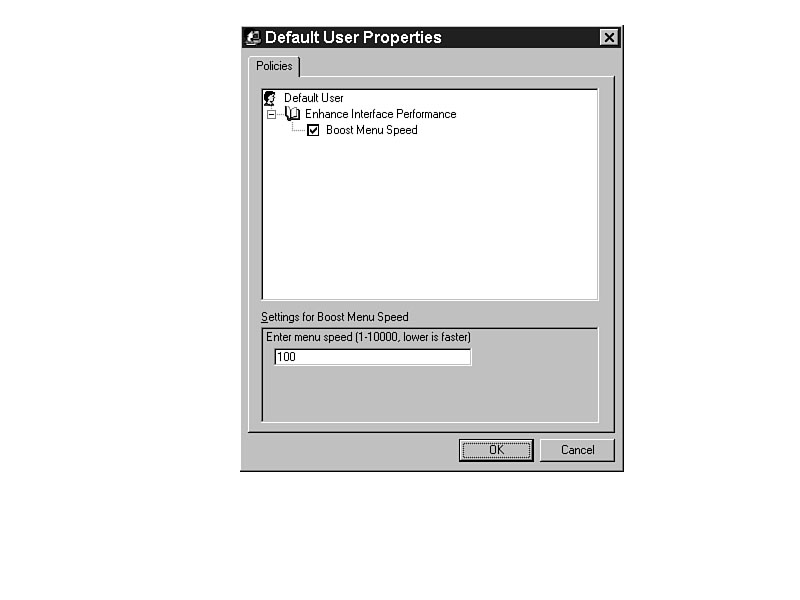
This .ADM creates the policy (as shown in Figure 34.5).
Figure
34.5. Boost the
menu speed with a policy.
TIP: MenuShowDelay will also work with Windows 95, and the value name will be added by System Policy Editor.
TIP: If you save the file and type the name as MENU.ADM in Notepad, the actual result will be MENU.ADM.TXT. Notepad always puts a .TXT extension on anything you type in the File Name entry box. To create the file without a .TXT extension, put the name in quotes ("MENU.ADM").
Creating a Custom Policy: MinAnimate
MinAnimate boosts the speed of your interface by eliminating the animation shown when a window is minimized or maximized. The MinAnimate value is not in the Registry, so System Policy Editor adds it for you automatically based on the entries shown in Listing 34.2.
Here is the listing of the text for this .ADM file.
Listing 34.2. MinAnimate template file.
CLASS USER
    CATEGORY !!SPEED
        POLICY "Boost Window Speed"
        KEYNAME "Control Panel\Desktop\WindowMetrics"
            PART "I want faster windows" CHECKBOX
            VALUENAME MinAnimate
                VALUEON "0" VALUEOFF "1"
            END PART
        END POLICY
    END CATEGORY
[STRINGS]
SPEED="Enhance Interface Performance"
The two things to notice in this template file are the change in the type of PART and the addition of the VALUEON/VALUEOFF entries. The check box allows you to enable or disable a selection. The VALUEON/VALUEOFF entries determine what happens when you make your selection.
NOTE: Notice that the normal entries for VALUEON and VALUEOFF have been reversed. The default is on, meaning that the animation is executed. However, in the dialog box presented to users, users choose whether they want faster windows. To get the faster windows (a YES selection), MinAnimate must be turned off. Set the template file so it is easy to read and understand, and then make the entries comply with the text.
The results of this template file are shown in Figure 34.6.
Figure
34.6. Boost your
window speed with a change in System Policy Editor.
Consolidate Your Template Files
Even though it is easy to manage multiple small template files, it is occasionally
better to consolidate them. If you add both of the templates you just created to
System Policy Editor, the category listing is duplicated, as illustrated in Figure
34.7.
Figure
34.7. Multiple template
files with the same CATEGORY name.
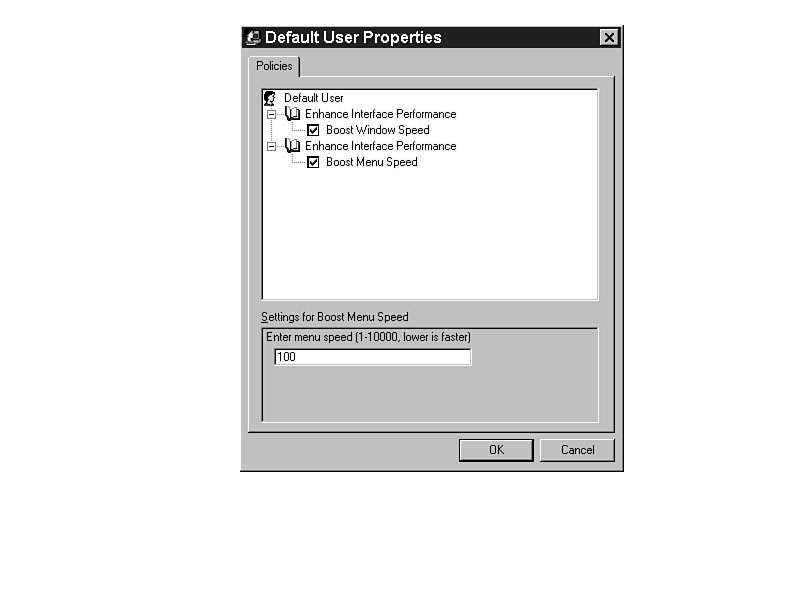
Even if Listing 34.1 and Listing 34.2 are in the same .ADM file, if two first-level categories are listed, they both show in System Policy Editor. To consolidate the categories, copy and add the POLICY section from one into the other, as shown in Listing 34.3. Figure 34.8 shows the result of the consolidation.
Listing 34.3. Consolidated template file.
CLASS USER
    CATEGORY !!SPEED
        POLICY "Boost Menu Speed"
        KEYNAME "Control Panel\Desktop"
            PART "Enter menu speed (1-10000, lower is faster)" EDITTEXT
            VALUENAME MenuShowDelay
            END PART
        END POLICY
        POLICY "Boost Window Speed"
        KEYNAME "Control Panel\Desktop\WindowMetrics"
            PART "I want faster windows" CHECKBOX
            VALUENAME MinAnimate
                VALUEON "0" VALUEOFF "1"
            END PART
        END POLICY
    END CATEGORY
[STRINGS]
SPEED="Enhance Interface Performance"
Obviously, consolidating the entries makes the whole process easier, cleaner, and more professional. You may want to group whole sections of policies together for ease of use.
Figure 34.8. Consolidated entries make a clean, concise policy.
Creating a Custom Policy: Network Install
Installation of software can be a challenging thing for an administrator. The Network Installation routine using a Registry change shown in Chapter 18, "Windows NT Networking and the Registry," greatly simplifies the task without the expense of buying and implementing something like SMS (Systems Management Server) from Microsoft.
To make the Registry change work, create a share and copy the installation files to it. For example, create a share named Install and create subdirectories for Excel, Collage for Windows, and PageMaker.
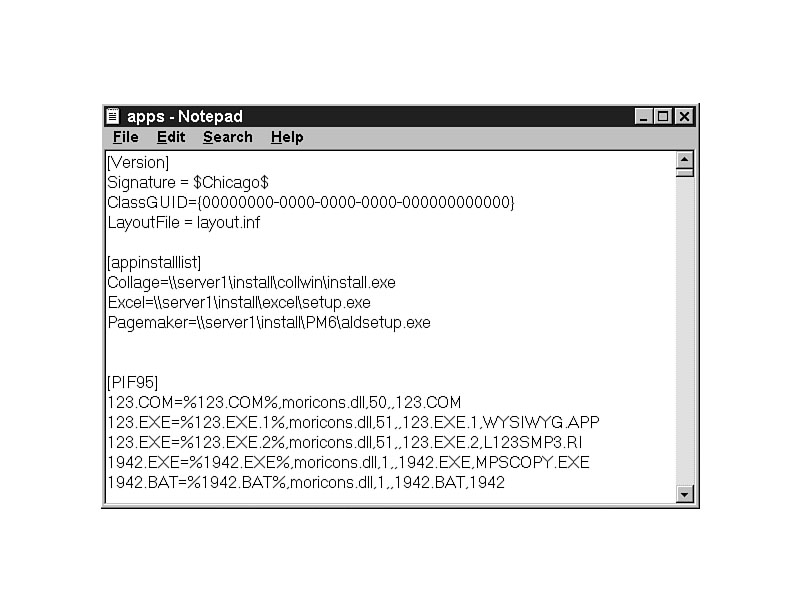
At the server, edit \WINNT\APPS.INF (for Windows NT) or \WINDOWS\APPS.INF (for Windows 95) and add the [AppInstallList] section, followed by a line for each of the applications, in the format Label=path to SETUP.EXE. This would look like the information in Figure 34.9.
Figure 34.9. Revised APPS.INF shows applications available for installation.
Next, create a policy for all systems that will allow the users to access the server directly for installing the applications. The template for the policy is shown in Listing 34.4.
Listing 34.4. Template file for network installation of software.
CLASS MACHINE
    CATEGORY "Installation"
        POLICY !!INSTALL
        KEYNAME SOFTWARE\Microsoft\Windows\CurrentVersion
            VALUENAME AppInstallPath
            VALUEON "\\SERVER1\WINNT\INF\APPS.INF" VALUEOFF ""
        END POLICY
    END CATEGORY
[STRINGS]
INSTALL="Allow network installation of applications"
NOTE: Without a PART entry, no part type need be listed. VALUEON and VALUEOFF automatically set the interface to use a check box for the POLICY, and allow the selection at the second level instead of the third.
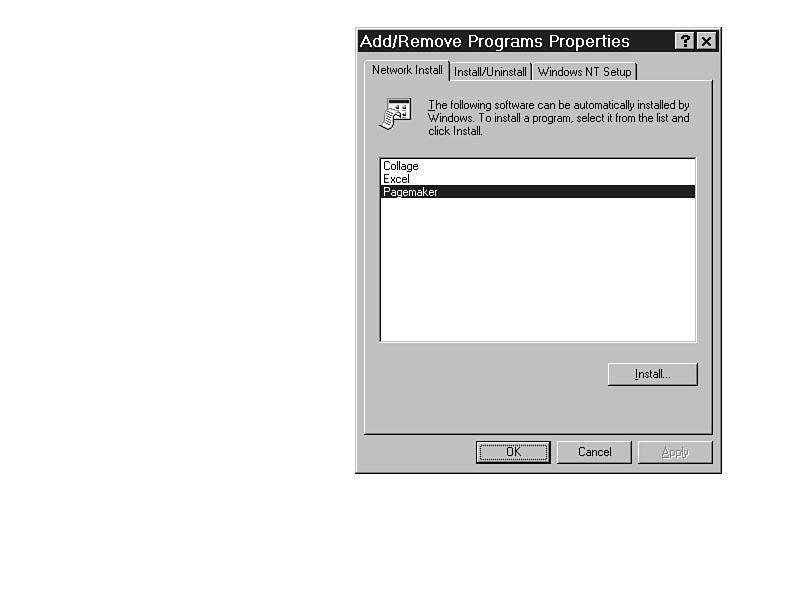
After the policy is activated at a workstation, the new Network Install tab is available in Control Panel | Add/Remove Software. Choose from the list and click Install to start the installation. The installation will then proceed the same as a normal installation, and you will need to answer all the questions.
NOTE: During a normal installation of Microsoft software, a CD-KEY is required. Though the installation files copied to the server are exactly the same as on the installation CD-ROM, the user will not be prompted for a CD-KEY.
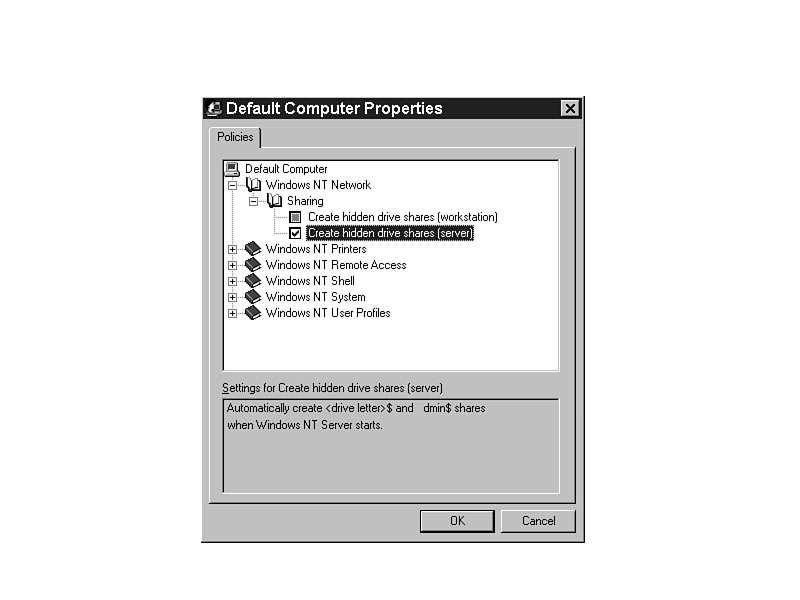
Figure 34.10 shows the results of this new policy. It can be activated for individual
systems or for all of the systems with default computer.
Figure
34.10. Application
installation simplified.
Effectively Implementing Custom Policies
Establish a procedure for implementing your policies, and always test your custom policy before rolling it out to all of your users. If you make a disastrous mistake in changing the Registries of all of the computers on the network, you might find it takes too much time to undo it. Most of the time, you can simply reverse the procedure in System Policy Editor, but you might find yourself in a real bind.
TIP: Create a new group in User Manager for Domains for testing purposes. I have five users in mine. Before I roll out any policy for all of the users on my network, I always test it on my "guinea pig" group. If it works for them, I can roll it out to others. All the users in the guinea pig group are fairly advanced, and can usually recover from any mistakes I make.
One of the biggest challenges is making a sweeping, universal change to every system in the network after you have several systems, users, and groups specified in System Policy Editor. To make a change for all the users or all the systems, even if there are system, users, or groups specified, make the change only to the default. Even if there is a specified computer in System Policy Editor, the original setting for any policy is to ignore it. If you don't change that, and you add a new policy and set it for the default computer, it will still be activated on the specified system.
If your current policy has already updated the Registries of all the systems on your network, and if the policies invoked do not require constant resetting, you can simply remove the policy file you have and replace it with another. Obviously, if you have set a policy to restrict a user with a setting that can easily be changed with Control Panel, you may want to leave your current policy in place. A set policy is only good as long as it does not get changed by the user.
An Alternative Implementation Procedure
Alternatively, you can create a temporary policy. Use the following steps to leave your previous policy intact for the long term, and create a temporary policy for the short term.
- 1. Copy your current policy file to another directory.
2. Remove the templates normally used.
3. Add a template or templates for your temporary policy.
4. Make the settings for Default Computer, Default User, or specified computers, individuals, or groups.
5. Save the file as NTCONFIG.POL (for Windows NT) or CONFIG.POL (for Windows 95) in the NETLOGON or PUBLIC share.
6. Instruct everyone to log off the network and back on again.
7. When users log back on to the network, the policy updates the Registry.
8. Copy the original file back to the NETLOGON or PUBLIC share.
The next time the users log on to the network, they will get the old policy file, but their Registries will have been changed.
Summary
Custom policies are relatively easy, and allow additional changes that the Microsoft programmers didn't include in System Policy Editor. Many of the changes listed in Chapters 13 through 25 make excellent options for custom policies. Of course, if you receive a Registry change from Microsoft in response to a support request, you might also want to implement that through a custom policy.
Creating custom policies doesn't take any programming skill or experience. It just requires you to be meticulous in your work. Use the steps shown here, and you will be able to easily and quickly update your system with any Registry setting you like.
![]()
![]()
![]()
![]()
©Copyright, Macmillan Computer Publishing. All rights reserved.